
Vmware update manager host cannot download files 6.5 - opinion you
Confirm. And: Vmware update manager host cannot download files 6.5
| Download minecraft servers 1.12.2 | 293 |
| The grand way flash mod download | 526 |
| Mp4 to wav to mov converter free download | 25 |

How to Patch ESXi with VMware Update Manager: Complete Walkthrough
ESXi hosts can be patched in the command line interface by using ESXCLI, though this method is most advantageous when the number of ESXi hosts you need to patch is not high. If the number of ESXi hosts required is high, patching each host in ESXCLI can take a lot of time and effort, especially if you have hosts of different versions. Fortunately, VMware provides vSphere Update Manager that can be used to update ESXi hosts from the single interface. Today’s blog post covers VMware vSphere Update Manager and explains how to upgrade and update ESXi hosts centrally.
Our comprehensive software offers robust protection of business data and applications. Participate in our Try & Buy Promotion and get the opportunity to receive an Amazon Gift Card for testing NAKIVO Backup & Replication in your environment.
What Is VMware Update Manager?
VMware vSphere Update Manager is a vCenter plug-in (extension) that must be installed manually on vCenter Server versions older than vCenter 6.5. If vCenter Server 6.5 is installed on Windows, you should install vSphere Update Manager (VUM) manually. VMware Update Manager can be installed on the machine with vCenter or on another Windows machine and must have network connectivity with vCenter since VUM is tightly integrated with vCenter Server. If you have installed vCenter Server Appliance (VCSA) version 6.5 or later, then vSphere Update Manager has been pre-installed in vCenter by default and starts automatically. It is recommended that you install vCenter 6.7 as VCSA – in this case, vCenter is running as a virtual machine (VM) on an ESXi server. VMware vCenter is a centralized management system for vSphere, and vSphere Update Manager is a centralized tool for updating/upgrading ESXi hosts, VMs, virtual appliances, and virtual applications (VMware vApps). You can also install and update software such as drivers on ESXi hosts, upgrade VM hardware, install and update VMware Tools. This way, you can update or upgrade multiple entities at once.
Advantages of VMware Update Manager
The advantages of using VMware Update Manager include flexibility and the possibility to install VMware patches on multiple hosts at once. Such an approach also allows you to manage VMware patches centrally by using vCenter with VMware vSphere Client and helps you save time spent on vSphere administration. You can also automate the ESXi patch installation. VMware Update Manager is universal and allows you to install VMware patches and third-party patches such as Cisco distributed virtual switch, updated drivers for Hewlett-Packard servers, etc.
Compatibility
Before starting the upgrading/updating process, be sure to check the compatibility of your current vCenter version with the new ESXi version, compatibility of your current ESXi version with the upgrade version, and compatibility of your backup software with new ESXi and vCenter versions that you will use after the upgrade/update. You can use VMware interoperability matrices on the VMware’s web site. Also, be sure to check the compatibility of your hardware with ESXi patches before you install these patches.
How ESXi Patching Works
Basically, the workflow of ESXi patching consists of the following:
- Uploading the needed installation file to Update Manager
- Creating a custom baseline
- Attaching the baseline to the required entity (ESXi host, datacenter, cluster etc.)
- Compliance check (optional)
- Remediation pre-check
- Remediation
Remember that in the most cases virtual machines must be shut down or migrated from ESXi hosts before starting remediation when you seek to update or upgrade these hosts. ESXi hosts enter the maintenance mode automatically when remediating. When remediation is done, ESXi hosts exit the maintenance mode, and a host reboot may be required. If you have chosen to remediate multiple ESXi hosts, the process of remediating the second host begins once the process of remediating the first ESXi host is finished.
Hence, the update and upgrade process for ESXi hosts can be divided into the following steps:
- An ESXi host is entered in the maintenance mode.
- A patch is installed.
- The ESXi host is rebooted.
- The ESXi host is reconnected to vCenter.
- The ESXi host exits the maintenance mode.
- The process of ESXi patching starts for the next ESXi host.
How to Use vSphere Update Manager to Patch ESXi Hosts
Let’s explain what’s involved in using VMware Update Manager for upgrading ESXi 6.5 to ESXi 6.7. In the current example, vCenter 6.7 is used for managing three ESXi hosts. VMware vSphere Update Manager is pre-installed in VCSA 6.7 (vCenter Server Appliance).
Open VMware vSphere Client, go to Hosts and Clusters, and select the ESXi hosts which you would like to upgrade/update. You can select a VM folder, cluster or the entire datacenter if necessary. In this example, the ESXi host whose IP address is 192.168.101.205 will be upgraded.
Note:Upgrade refers to changing a version of ESXi host, vCenter Server, etc. from a minor version to a major version, for example, v.6.0 to v.6.5, v.6.5 to v.6.7, etc.
Update refers to installing patches that fix bugs on the current version. The build number is increased, but the version remains the same after applying an update. For example, updating ESXi 6.7 to ESXi 6.7 U1, ESXi6.7 U2 or ESXi6.7 U3 preserves version 6.7.
Upgrading ESXi 6.5 to ESXi 6.7
Select the required ESXi host and check the version and build number in the Summary tab. Pay attention to the Updates tab that is present when VMware Update Manager is installed in vCenter. You can also open the Updates tab to check the ESXi version and build. As you can see on the screenshot, ESXi 6.5 build 8294253 is used in the example (the IP address of the ESXi host is 192.168.101.205 and the IP address of vCenter is 192.168.101.103). In the Updates tab, you can see a link to the VMware Update Manager page of vCenter.

You should have all required packages before you can upgrade ESXi. Notice, that you should download the ESXi 6.7 ISO installer manually before updating ESX 6.5 in vSphere Update Manager.
Uploading the image for upgrade
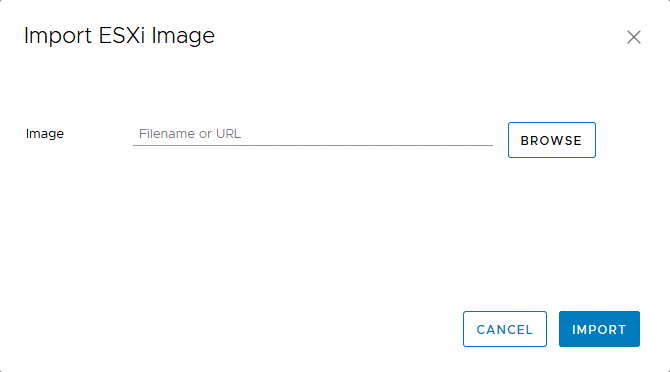
Go to VMware Update Manager (Home > Update Manager), select the ESXi images tab, and click Import to import the ESXi 6.7 installation ISO file to the repository of vSphere Update Manager.

Click Browse and select the ESXi 6.7 installer ISO file. Click Import to import the image to a repository.
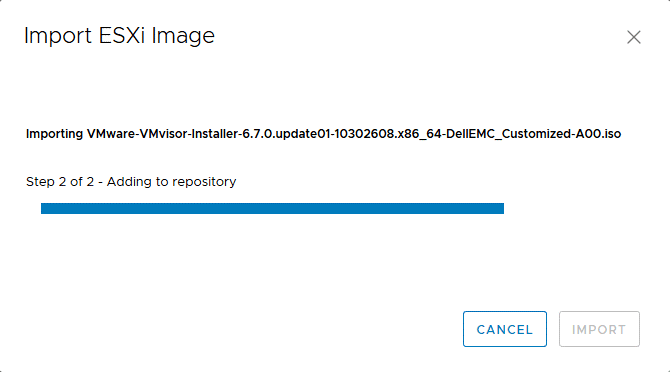
Wait until the ISO image has been copied.
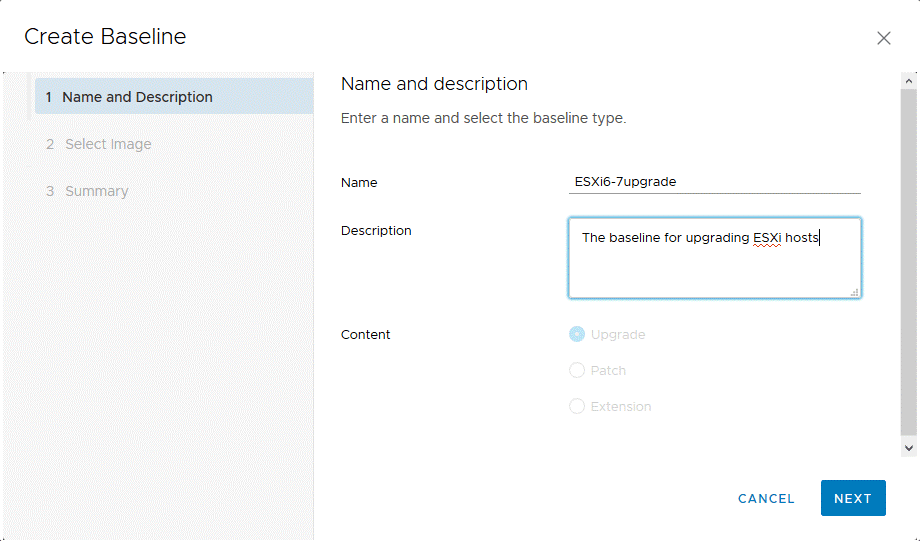
Once your ESXi 6.7 installation image has been copied to the Update Manager repository, you should create a new baseline. A baseline is like a preset that can be applied to multiple entities, such as ESXi hosts, at once. Baselines are divided to host baselines, VM (virtual machine) baselines, VA (virtual appliance) baselines. VM baselines and VA baselines cannot be created manually, as they are predefined. You can also create baseline groups. In the current example, a baseline includes one ESXi image for upgrade. However, you can select multiple patches (updates), upgrades or extensions to add to a baseline. Then you can use one baseline to install multiple patches on ESXi hosts simultaneously.
Creating a baseline
In the ESXi images tab, hit New Baseline.

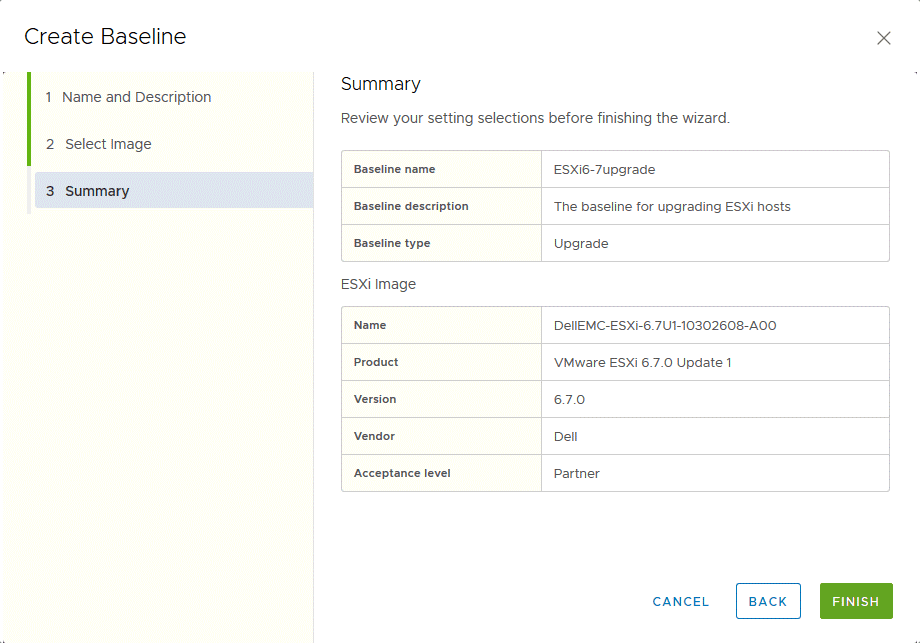
The Create Baseline wizard that is now opened contains three steps.
1. Enter a name and description for a new baseline. In the current example, the name is ESXi6-7upgrade. Hit Next to continue.
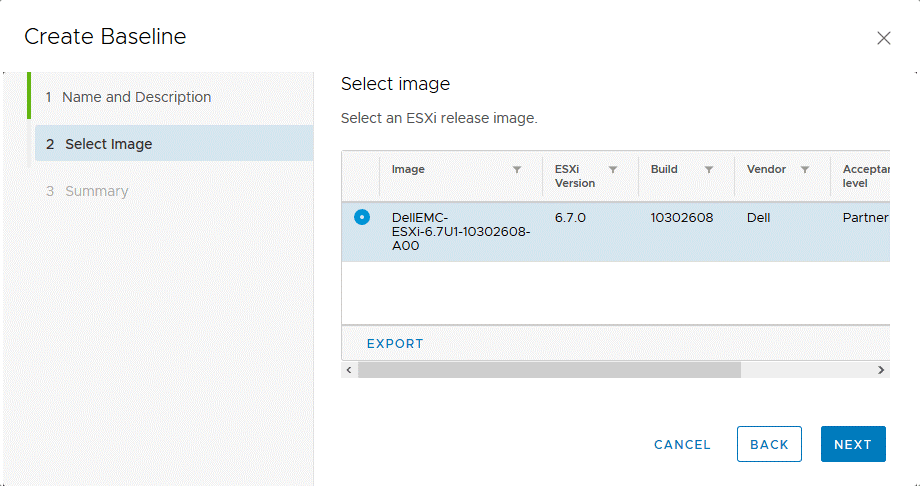
2. Select an ESXi release image. The ESXi 6.7 Update1 ISO image is selected in this case. Hit Next.
3. Check the summary and click Finish.
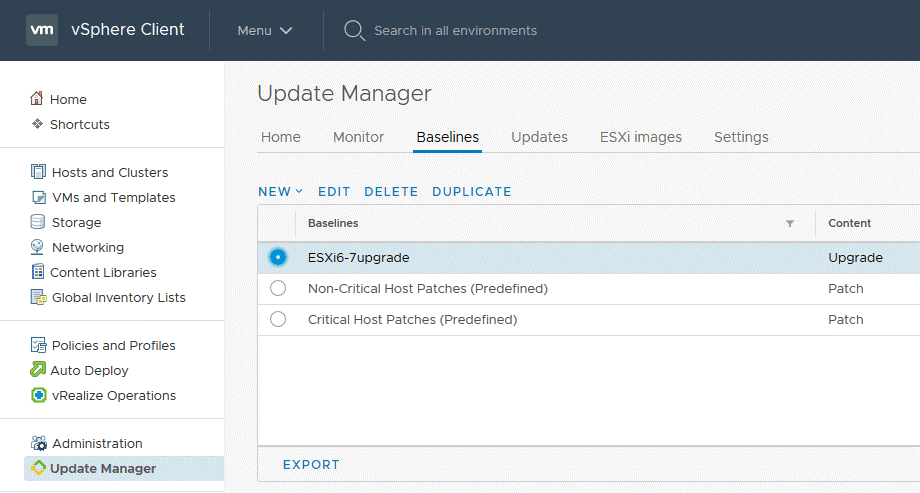
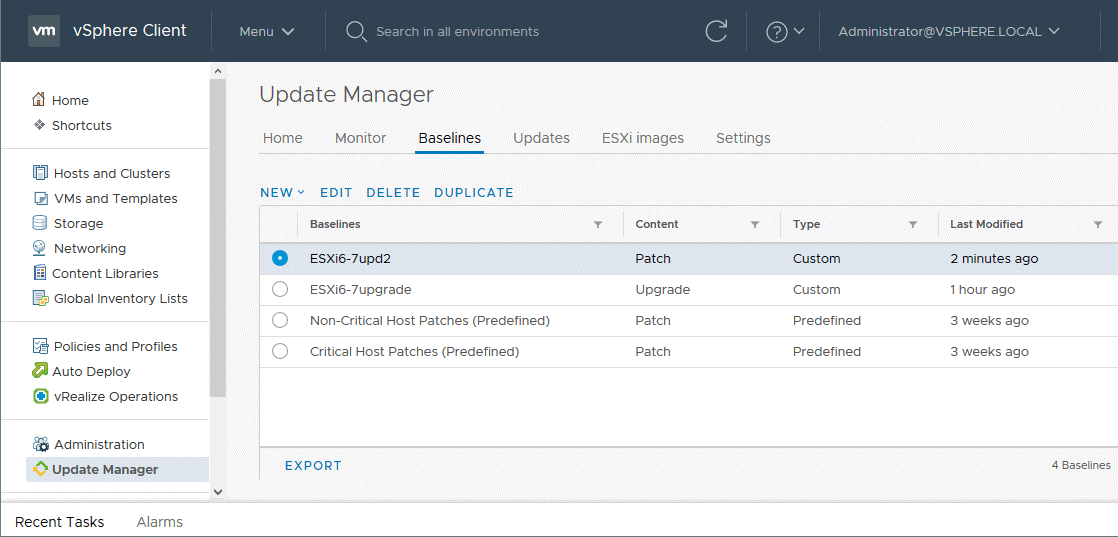
The baseline has now been created, and you can see the created baseline in the Baselines tab of VMware Update Manager. You can also see two predefined baselines (Non-Critical Host Patches and Critical Host Patches).
Attaching a baseline
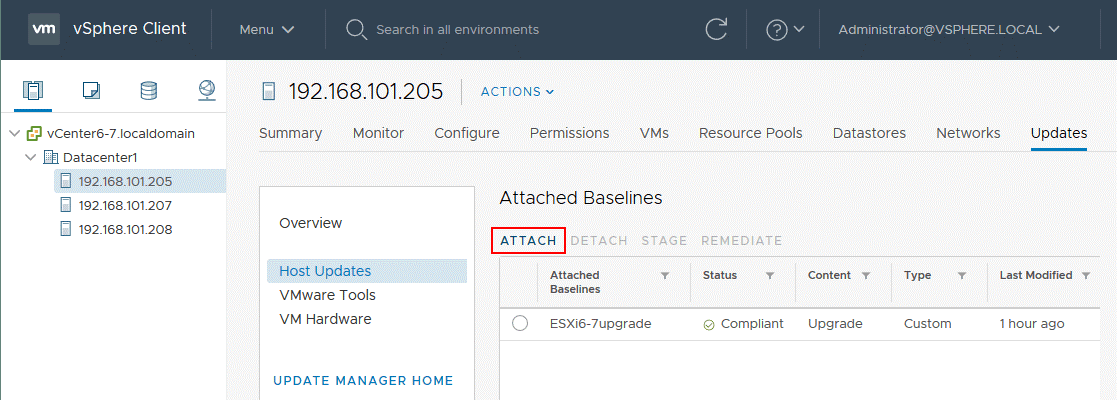
Go to Hosts and Clusters, select your host (ESXi 6.5), and select the Updates tab. In the Overview section, select Host Updates, then in the Attached Baselines section, hit Attach.
Note: You can select the entire datacenter, VM folder, or cluster if you wish to upgrade multiple ESXi hosts.
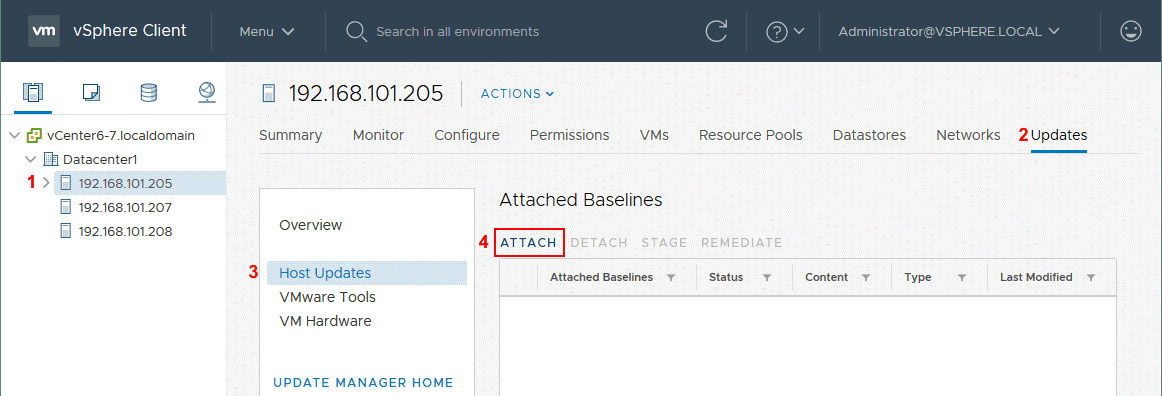
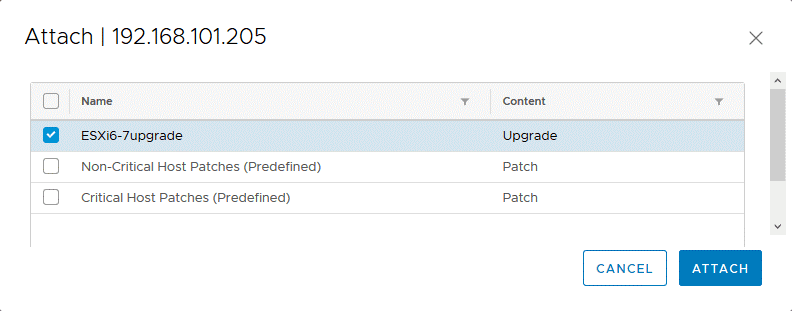
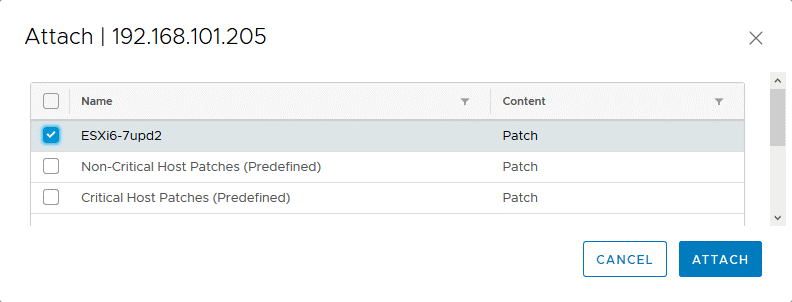
Select your custom upgrade baseline (ESXi6-7upgrade in this case) and click Attach.
Checking compliance
Go back to Hosts and Clusters, select your ESXi host (datacenter, VM folder or cluster), then select the Updates tab.
In the Updates tab, select Overview, then choose Host Compliance, and click Check Compliance.
The compliance check allows you to verify the state of updates added to baselines and notify whether or not there are conflicts. If update or upgrade is unsupported, VMware Update Manager will notify you when performing the check compliance.

In our example, the host compliance status is non-compliant, but upgrade can be technically done for selected hosts.
Pre-check remediation
Pre-check remediation should be performed to verify conditions and identify possible problems that may occur after remediating. If there are possible issues, the list of recommended actions is displayed. For example, if you are going to upgrade or update ESXi hosts and VMs are running in a cluster, you may need to disable DPM, HA admission control, and enable DRS, EVC etc. As for VMs, you may need to disconnect a virtual DVD drive, disable Fault Tolerance for the VM in a cluster, etc. Pre-check remediation allows you to avoid terminating the update/upgrade process after starting.
Go to Hosts and Clusters, select your ESXi host (hosts), right-click the host, and select Update Manager > Pre-check Remediation in the context menu.
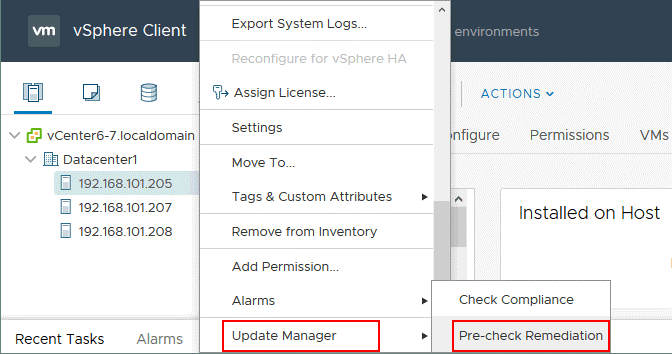
Wait for a while until the checking process is finished. If there are warnings after finishing the pre-check remediation process, perform the recommended actions to fix the issues.
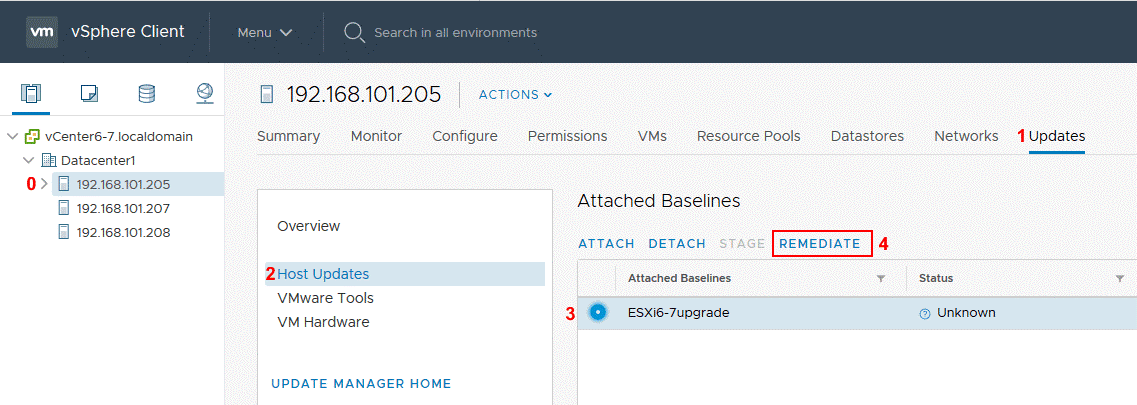
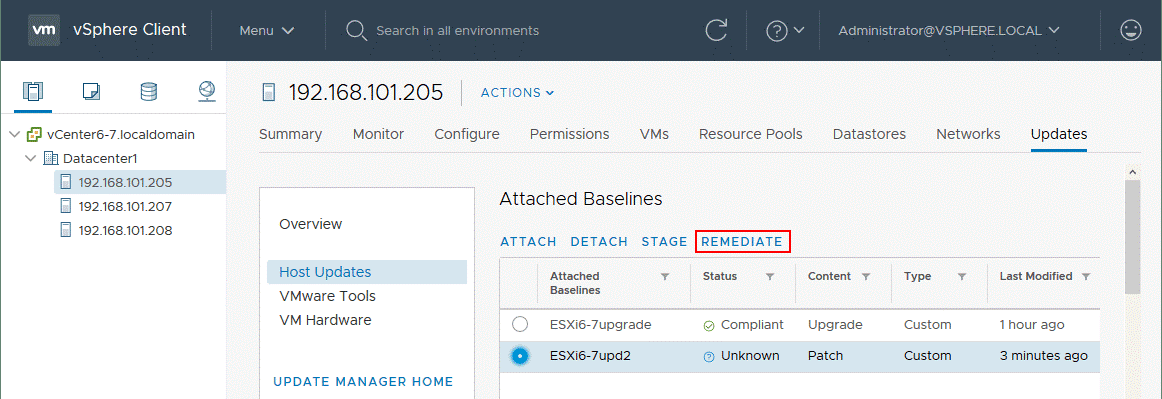
If everything is correct and no actions must be performed to begin remediation, go to Hosts and Clusters, select your ESXi host, select the Updates tab, and open the Host Updates category in the Overview section. Select the required baseline (ESXi6-7upgrade in this case) and click Remediate.
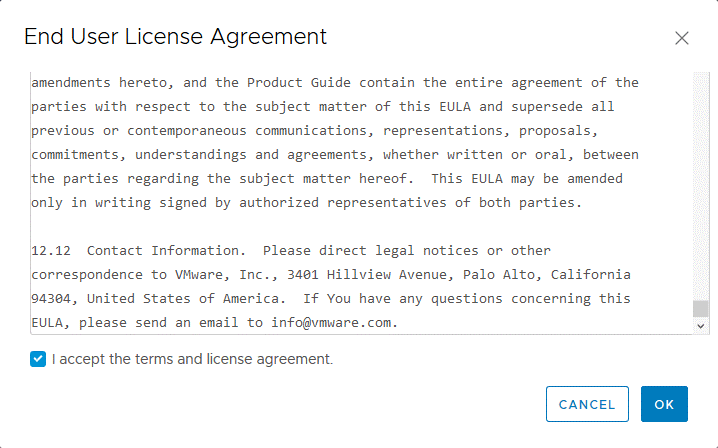
Read and accept the End Use License Agreement (EULA), tick the appropriate check box, and hit OK.
Select the ESXi hosts that need to be remediated, edit settings if needed (scheduling settings, remediation options), and click Remediate.

All VMs must be shut down or migrated from the host before remediating. The host will enter the maintenance mode automatically. You can see the progress of the remediation process in the Recent Tasks tab. Wait until the process is finished. After upgrading an ESXi host, the host must reboot and exit the maintenance mode automatically.

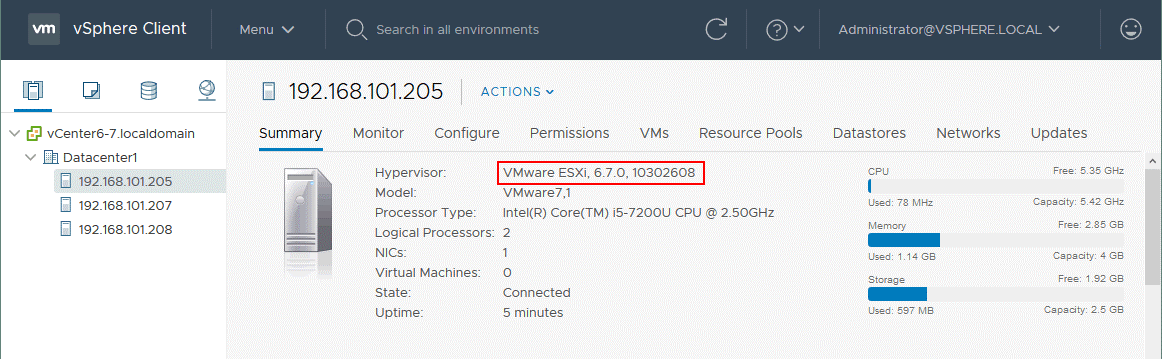
Once the ESXi upgrade process is finished and your ESXi host is rebooted, select this host in the Host/Cluster page, and verify the version and build number. As you can see on the screenshot below, our ESXi host has been upgraded from v6.5 build 8294253 to version 6.7 build 10302608 (Update 1). You can compare your build number with the build number in the table and identify the version, release name, and release date.
The ESXi host has been upgraded successfully, you can run VMs on this host again.
Updating ESXi 6.7 to ESXi 6.7 Update 2
If you use ESXi 6.7 hosts, you cannot upgrade these hosts until a new version of vSphere has been released. At the moment of writing this blog post, vSphere 6.7 is the latest version. However, updates that contain security patches and other patches have been released by VMware. ESXi 6.7 hosts can be updated to ESXi 6.7 Update 1, Update 2 and Update 3 at this moment. Let’s consider how to update ESXi host version 6.7 Update 1 to version 6.7 Update 2 as an example. You can use this process to update your ESXi 6.7 Update 2 to ESXi 6.7 Update 3 by using VMware Update Manager as well as installing custom VMware patches. As you may recall, the current version of ESXi host considered in our example is version 6.7 Update 1 build 10302608.
Open vSphere Update Manager (in vSphere Client go to Home > Update Manager) and select the Updates tab. You can see a list of available updates and patches, their severity, type, and category. The required VMware ESXi 6.7 Complete Update 2 is present in this list, hence, we can continue.

Creating a baseline
As seen in the previous example, first you have to create a new baseline. In VMware Update Manager, open the Baselines tab, click New > Baseline.
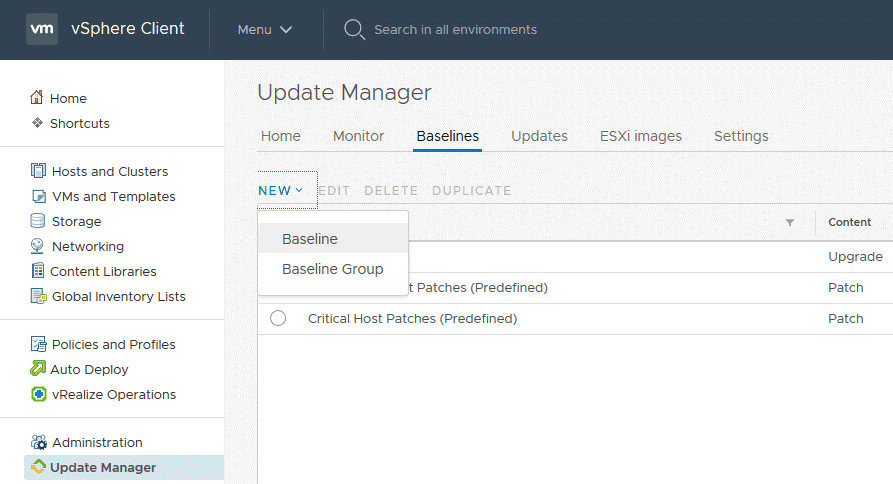
The Create Baseline wizard is opened.
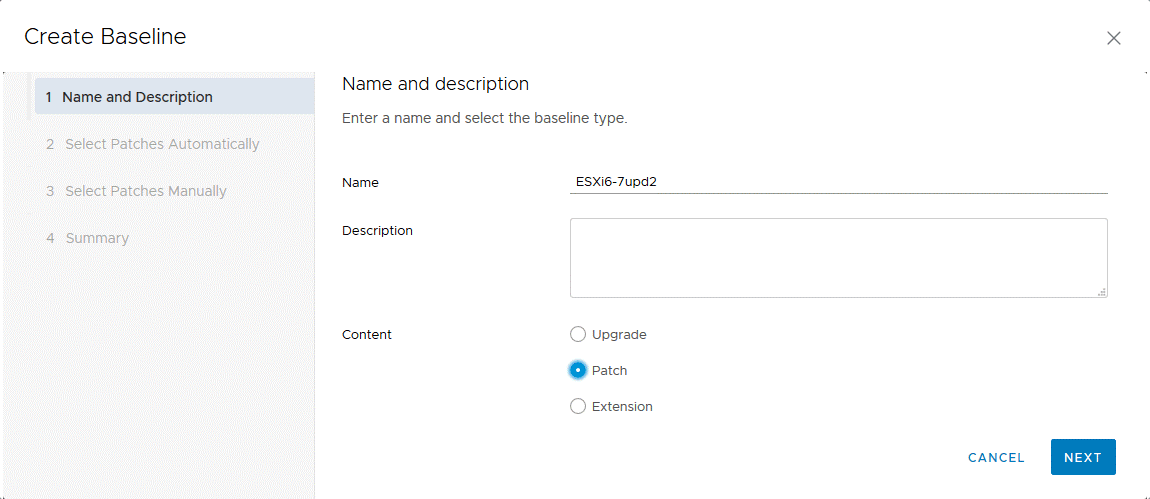
1. Name and Description. Enter a name, for example ESXi6-7upd2, enter description (optional), and select the baseline type. In this case, the content type is Patch. Hit Next to continue.
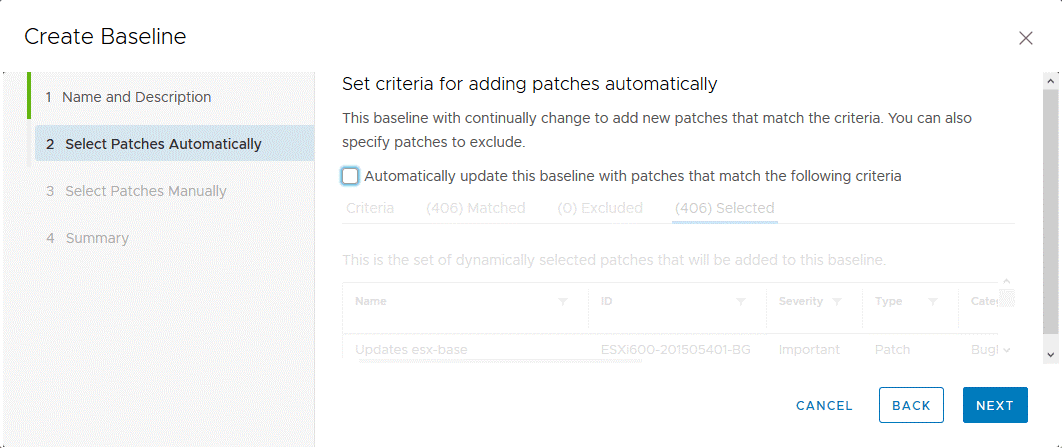
2. Select Patches Automatically. As we would like to install the necessary update manually, the “Automatically update this baseline with patches that match the following criteria” checkbox must be unchecked. Otherwise, all available VMware patches will be suggested for installation.
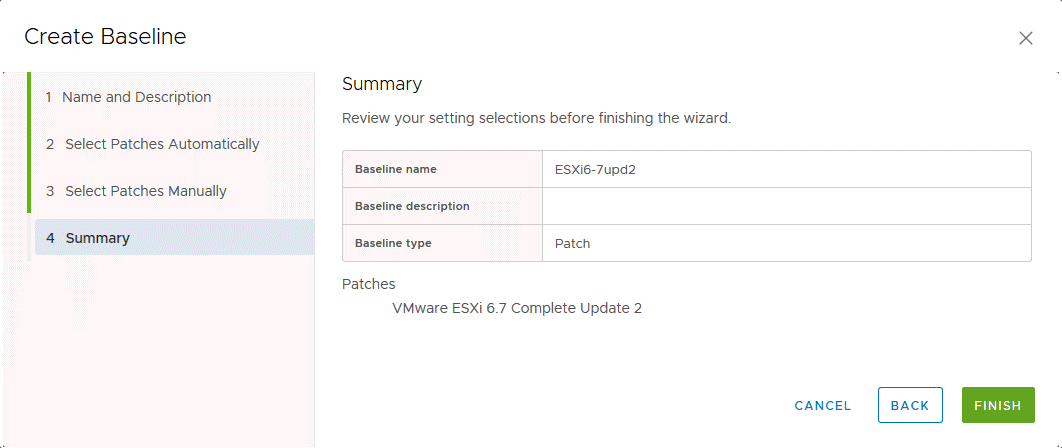
3. Select Patches Manually. Select the required VMware patches. VMware ESXi 6.7 Complete Update 2 has been selected in this example.

4. Summary. Check your baseline settings and if everything is correct, hit Finish.
Now that a baseline has been created, you can see the new baseline in the Baselines tab of VMware Update Manager.
Attaching the baseline to the host
Now, go back to Hosts and Clusters, select the ESXi host that you would like to patch, and select the Updates tab. Click Host Updates and in the Attached Baselines section, click Attach.
In the popup window, select the required baseline (ESXi6-7upd2 in this example) and hit Attach.
Remediating the ESXi host
Now that the baseline has been attached to the ESXi host, you can select this baseline. You should prepare your ESXi host for remediation and shut down or migrate VMs from the hosts which must be patched. Keep in mind that the ESXi host needs to enter the maintenance mode in order to install ESXi patches. Next, click Remediate to start updating the ESXi host.
In the new opened window, confirm the host you would like to patch, and select this host by ticking the checkbox (the checkbox is checked by default). Configure additional options if need be, and hit Remediate to start patching the ESXi host.
Wait until the remediation process is finished. After that, select your ESXi host and, in the Summary tab, check the version and build number to ensure that the host has been patched successfully. Now our ESXi host has been updated to version 6.7.0 Update 2 Build 13006603.

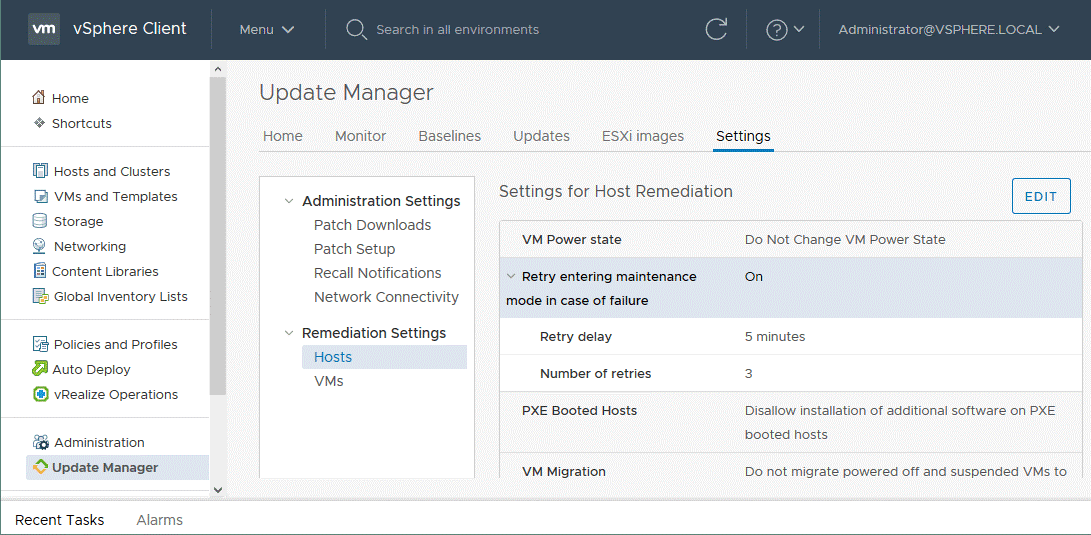
Notice, that you can configure global settings of VMware Update Manager if needed by going to Update Manager > Settings.
Conclusion
VMware Update Manager is a useful module intended for managing and installing updates in VMware vSphere environments. VMware vSphere Update Manager (VUM) is tightly integrated with vCenter and is included with VCSA 6.5 and VCSA 6.7. It is especially recommended that you use VUM to update or upgrade components of large vSphere environments. Today’s blog post has explained how to use this VMware patch tool to upgrade an ESXi host and install VMware ESXi patches on examples. Don’t forget to check the compatibility before installing patches and be aware of migrating or shutting down virtual machines running on ESXi hosts scheduled to be patched.
Regarding compatibility of new versions of vSphere components such ESXi hosts and vCenter with backup software, NAKIVO Backup & Replication supports VMware vSphere 6.7 Update 3 and allows you to protect your VMs running in VMware vSphere environment in the best way possible. Download the latest version of NAKIVO Backup & Replication and try the product in your environment free of cost.


-