
Utorrent rename files before downloading - opinion
EventGhost
[HOW TO] Completely Automate Your XBMC and Downloads
Postby fault » Thu Sep 12, 2013 9:21 pm
====Intro====
Ok guys, here is my guide to make a fully automated HTPC. This should take you through all the steps to have all of your shows and movies automatically and/or remotely download, be converted, renamed, and organized, to optimize your XBMC viewing. I want to put this out there, I am in no way an expert at any of these programs, nor a developer who is a wiz with computer code. I simply have looked through many, many guides until I found what worked for me, and thought Id share it with you. I will do my best to keep this guide as straightforward and complete as possible, and provide many pictures.
What this tutorial will do for you:
-allow all of your favorite shows to be downloaded automatically, similar to a DVR
-automatically rename and organize all your Tv Shows into the right order to be recognized by XBMC
-automatically rename and organize all your Movies to be recognized by XBMC
-Move downloaded files into a separate folder so that you can still keep seeding files, while having another file organized and ready to view
==What you will need (and install)==
-XBMC - http://xbmc.org/download/
-TheRenamer - http://www.therenamer.com/
-EventGhost -http://www.eventghost.org/downloads/
-uTorrent v3.2 Build 27886 -http://www.oldapps.com/utorrent.php?old_utorrent=8183
--NOTE: This is NOT the most up to date version of uTorrent. This version has a feature that was removed later on, was supposed to be reimplemented, and wasnt. For now, use this version
==Websites to know==
-Torrentz -www.torrentz.eu
--A great metaseach website for torrents, which allows you to search many different torrent sites
-EZTV.it
--One of the best sites for downloading and watching TV shows. Used in this guide for its RSS functionality
-uTorrent remote -https://web.utorrent.com/
--This can be used via web based, or android app. This allows you to add torrents remotely into utorrent, so you can have them downloaded before you even get home.
-http://trakt.tv/
--A great website that keeps a list of all the episodes and movies you have on our HTPC. It also keeps track of what you have watched, what you havent, allows you to rate every video after you watch it, and make recommendations
==Some things to note==
-Some elements of this tutorial can obviously be changed up. I am doing this based off my setup, and my system
-I currently have a 1tb internal HDD, and a 4tb external HDD. I personally prefer to keep all my completed media on the external HDD, and the downloading files on the internal one. So all of these tutorials will be based off getting the file from the internet->internal HDD->organized->external
-For the sake of keeping the tutorial simple, when talking about downloading TV shows, I will be refering to the show Breaking Bad. Obviously you can do whatever show you want, but just so I dont have to keep reiterating that, I thought Id say it now
-C drive is my main storage, D drive is my external
====Part 1: Setup====
==Setting up folders==
We need to make the following folders:
C:\Torrents\Complete
C:\Torrents\Incomplete
C:\Torrents\Moving\Movies
C:\Torrents\Moving\TV Shows
D:\Movies -This is our main movie folder
D:\TV Shows New -This is our main tv show folder
-These are the folders where our media files will be downloaded, converted, and moved to.
==Setting up uTorrent==
For this part, Im going to simply copy and paste from Dean Vaughan's blog. He does a good job of describing it, no
sense in paraphrasing. The original post can be found here: http://deanvaughan.org/wordpress/2013/0 ... -for-xbmc/
The goal with uTorrent is to apply labels to the torrents you are downloading so uTorrent will sort the files into directories for you.
The first thing you want to do is set up your labels. In uTorrent go to Options->Preferences->Advanced->UI Extras. Under Persistent Labels type in TV Shows|Movies. The screen shot below is an example.

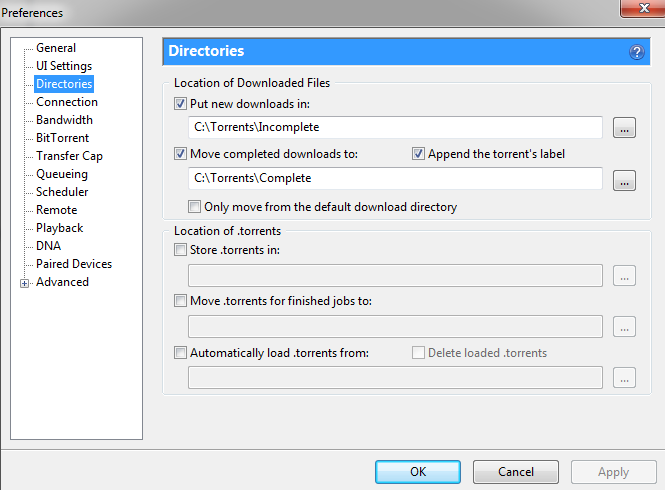
Next you want to setup uTorrent to place your downloads in an easy to find directory, and to sort those downloads into directories with the same name as your labels. With the uTorrent preferences window still open from the last step, click on Directories. Then check mark ‘Move completed downloads to:’ and also check mark ‘Append the torrent’s label’. In the text box below type in C:\Torrents\Complete. NOTE THIS IS DIFFERENT THAN IN THE SCREEN SHOT. The screen shot below is an example.

Now when you queue up a TV show or movie in uTorrent, you’ll want to apply a label to it. You do this by right clicking the downloading torrent and selecting the label from the menu.

Now you’re all set with uTorrent. Whatever you download and apply a label to will be sorted into directories for you. We also need to setup having an incomplete folder. This is where the files are downloaded to while they are downloading, then they are moved to the completed. Go back to Options->Preferences->Directories, and edit the boxes so they look like this:
==Setting up XBMC==
This part as well, Im going to borrow from Dean, but I will use my file locations. Ill also add in some extra notes, but I just want to make sure I give him some credit
Open XBMC and go to Videos->Files->Add Videos. Click on Browse and find D:\Movies and then click on OK twice.
You’ll get to a screen about setting content, just click on OK again.
Click on Add Videos again, then Browse and find D:\Movies. Click OK twice. This time on the Set Content screen, change ‘This Directory Contains’ to Movies and pock mark ‘Movies are in separate folders that match the movie title’. When done click OK and let it refresh.

Now we’re going to repeat for TV shows. Click on Add Videos again, then Browse and find D:\TV Shows New\. Click OK twice. This time on the Set Content screen, change ‘This Directory Contains’ to TV Shows. When done click OK and let it refresh. Now what we have done is setup XBMC to automatically scan these folders for updates, and add it to our library.
==Setting up TheRenamer==
The renamer is an amazing application that will allow automatically scan a video file, identify the Tvshow, episode number, season, or movie title, rename it, and put it in a folder that matches it, in a seperate directory. An important thing to note is TheRenamer does not copy files, it moves them. There is no original file left. It is removed and moved. That is why I made this tutorial. With TheRenamer, you could potentially just make it automatically pull from your torrents folder, and be done, but that screws up a few things. One big one is it messes up your seeding. Since it removes the file, it wont be there to be seeded. Some trackers will penalize or ban you for having a poor ratio. Also this can cause problems if the file is not fully complete. Another great thing is TheRenamer will remove all those useless info files and sample files,while still moving the subtitle files
TheRenamer has 2 modes, TV and Movies, which work off different databases. The most important thing to know is that the movies portion requires you to select the parent folder of the video file, and it works much smoother when the title of the folder matches the title of the video file. Movies are much trickier than TV shows, as they do not always follow the same rules, where most TV shows have pretty set naming policies.
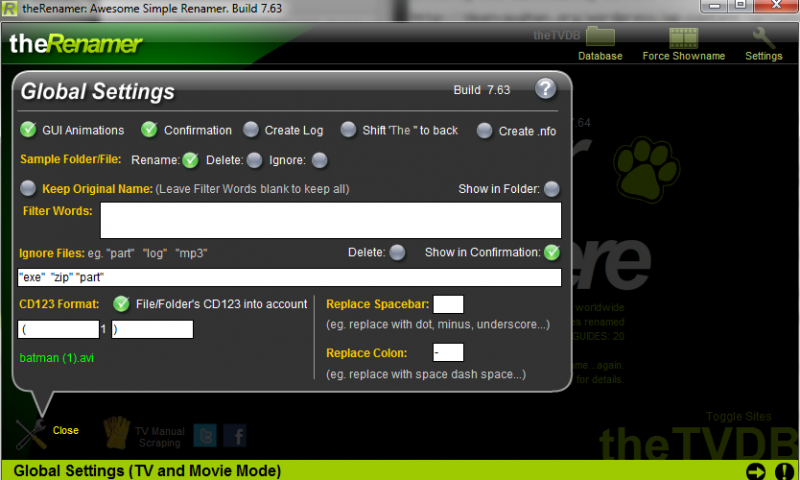
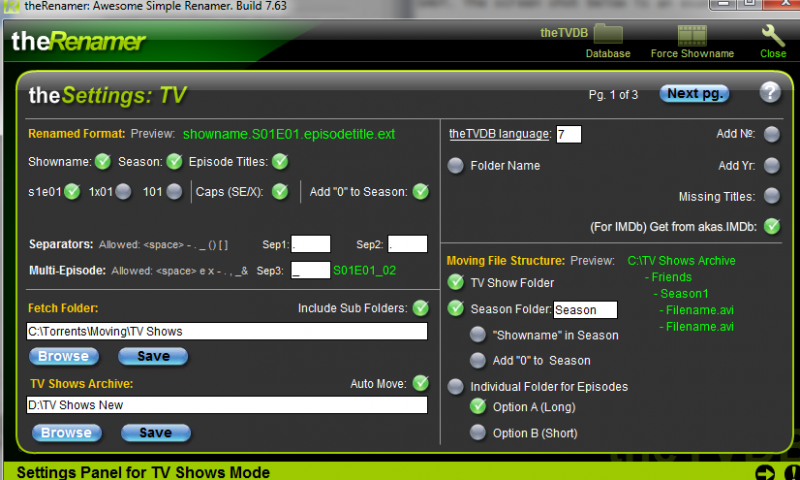
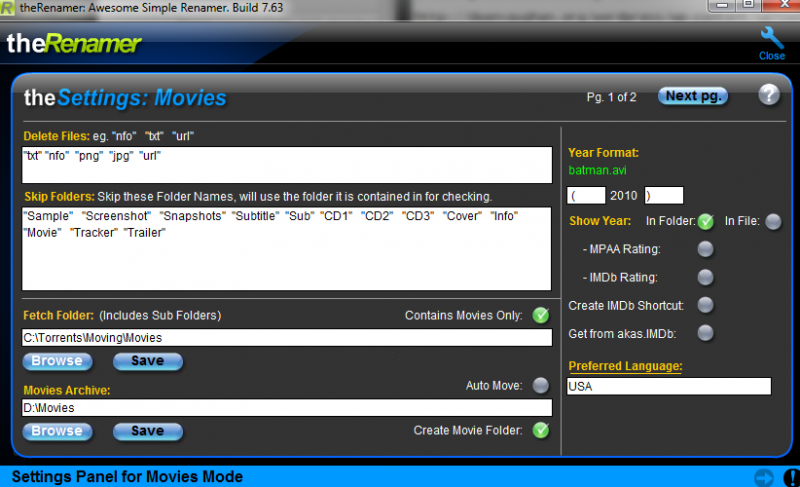
TheRenamer can work manually and automatically. Manually works by simply dragging the folder/file over, and it will work to rename and organize. The automatic will pull from whats called the fetch folder, which is essentially its default directory. There are different directories and settings for the Tv and Movies mode, but to keep it easy, Ill just copy my settings for both (note there are 3 pages for each, only posted the ones where I changed the settings):
Global Settings:
TV:
Movies:
NOTE: Occasionally, you will have issues with shows not being recognized, seen, w/e. At the very bottom of this tutorial, Ill add how to deal that.
====Part 2: Downloading====
==Manual==
The manual part of this guide is pretty simple. This is more typically done when you need to download a whole season, or if you are on the go and need to download something remotely. Through the use of labels, you can have it automatically renamed and moved. Simply find the torrent you want to download, such as breaking bad season 4, and you should see this window (below). You now need to make sure you edit the label on the download, by changing the box here. For TV shows, do TV, movies, do movies, pretty simple. This will put the file into a seperate sub folder in C:\Torrents\Complete , one for C:\Torrents\Complete\TV\ and one for C:\Torrents\Complete\Movies\.
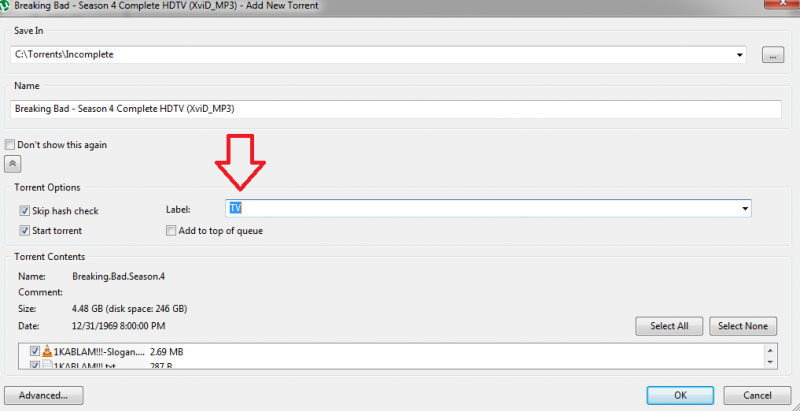
If you ever forget to do this, and the file is still downloading, you can edit the torrents label by right clicking on the torrent.
If the file is completed, then you need to copy the file/folder to another directory on you computer, then click and drag into TheRenamer, and run it through.
==Automatic==
Through automatic downloading, you can have all your shows instantly begin downloading as soon as they are put online. This is great for people like me who cant watch shows as soon as they air, due to school and work. This is all done through RSS feeds on EZTV.it. I am sure there are other sites out there, but this is the one I prefer, and it what we are sticking to.
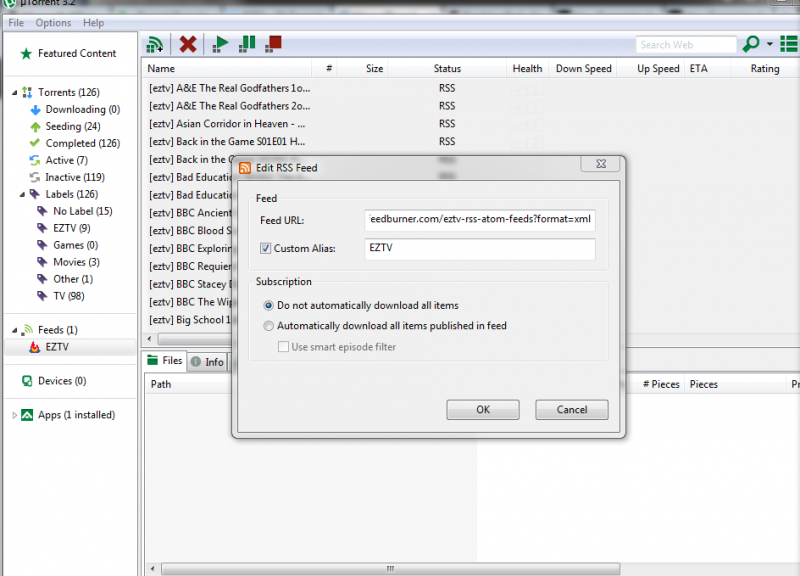
The first step is to add the RSS feed. On the side there should be an option that says "Feeds". Right click it and select "Add RSS Feed".
In the top box of that, paste the Feed URL: http://feeds.feedburner.com/eztv-rss-at ... format=xml .
This URL is the same for any TV show you want from EZTV. All the feed is is a list of there most recent uploads. Any changes to this list that match the criteria we are going to setup in a minute, will automatically be added to uTorrent. It should look like the following:
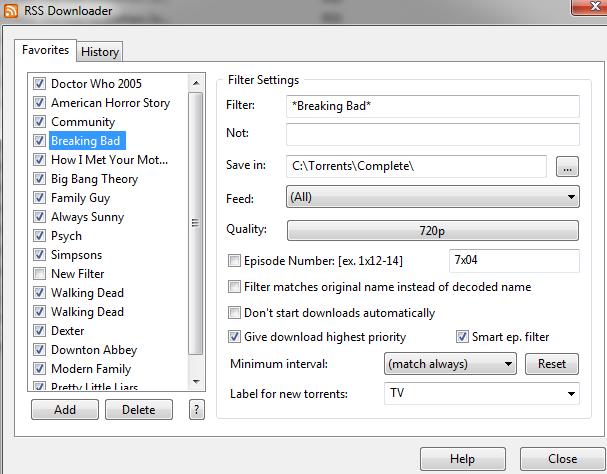
Now that we have our feed setup, we need to setup our specific TV shows we want. Right click the EZTV feed that we just added and select "RSS Downloader". This allows you to create your specific filter for how you want your show to download. Im going to show you a completed filter, and explain some specific parts related to it. Once you have the filter form completed, MAKE SURE to press add in the left corner. Ive forgot more than once and wondered why a show wasnt downloading.
Filter
-This is the Name of the show you want to watch. Always name your shows "*SHOW NAME*" , without the quotes. You need the * to allow there to be text before or after the show name. Make sure however you have it named, is how it appears on EZTV. For example, some shows have both a british and american verison. Based off how you name it in your filter, you can make sure you are getting the show you want
Not
-This would be exclusionary criteria. If the torrent has this word in the title, it will be removed
Quality
-This allows you to set the minimum quality of the video file you want to download. Many times there will be two versions of every episode that are uploaded to EZTV, a standard definition and a HD. Before selecting a higher quality, ensure on the EZTV site that your show has a higher quality option
Label
-This part is important, because we want to make sure that it automatically goes to the C:\Torrents\Complete\TV\ folder
Once completed, make sure to press add, and continue on with adding in all your shows. I suggest closing out after each show is added, just to make sure you saved them all properly.
====Step 3: Event Ghost====
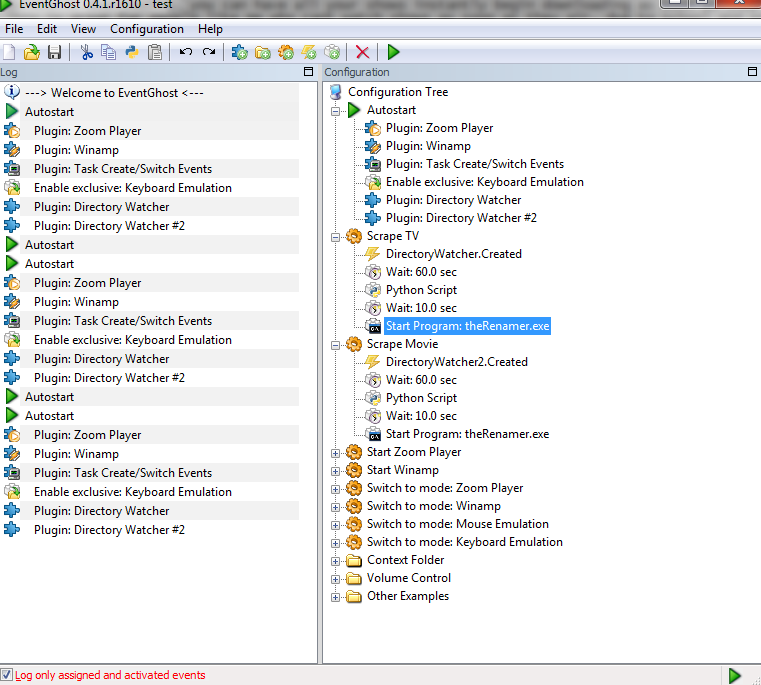
This is the step where everything gets tied together. Currently, when our file begins to download, its in the incomplete folder. When it is completed, it moves to the complete\tv or complete\movies. Now we are going to make an event, so that as soon as a file is added to complete\movies, it copy to a separate directory, to then be processed by TheRenamer, then moved to our final directory. This prevents duplication of files, wasted space, an uninterrupted downloading/seeding.
To make it simple for you, I uploaded my xml file that you can simply open in eventghost. If you have been using the exact same folders as I have, this step is almost done for you. If you havent, then you need tow edit each task with your directories. Here is what your event ghost page should look like (or similar to).
Event ghost xml: http://sdrv.ms/1b9ExvS
NOTE TO x86 users and those who installed TheRenamer or Utorrent in a nondefault directory. I have a x64 system,so my directories might be different than yours. Double check and correct these if need be!
There is an event ghost option to make it so XBMC updates its library automatically, but I personally feel it does it the best within the app itself during a reboot, so I do not use it.
====Step 4: Testing====
This is the last step, just to make sure everything worked. You can either manually download something, or wait until your feed pulls a new show. Either way, once it is downloaded, give it about 5 minutes, because within event ghost there are some timer delays to make sure the files copy properly.
If everything worked, you should see your completed file under D:\Movies or D:\TV Shows New in its properly named folder and season.
====Step 5: Trak.tv (optional)====
http://trakt.tv/downloads/xbmc - plugin for XBMC
http://trakt.tv/downloads - apps for phone
As I described above, this is a great way to keep track of what you have and what you dont have. Also what you have watched and what you havent. Its a good way to keep track with friends and see what they are watching. Its fun and easy to use
====Step 6: uTorrent Remote(optional)====
Ill be adding this later
====Troubleshooting The Renamer===
This part Ill have to add a bit later. Sorry, bit busy recently, and this took 3 hours to write anyway.
====Outro====
I hope this helps you guys out, took me a long time to get this all running smoothly. If you have questions just ask!
Ok guys, here is my guide to make a fully automated HTPC. This should take you through all the steps to have all of your shows and movies automatically and/or remotely download, be converted, renamed, and organized, to optimize your XBMC viewing. I want to put this out there, I am in no way an expert at any of these programs, nor a developer who is a wiz with computer code. I simply have looked through many, many guides until I found what worked for me, and thought Id share it with you. I will do my best to keep this guide as straightforward and complete as possible, and provide many pictures.
What this tutorial will do for you:
-allow all of your favorite shows to be downloaded automatically, similar to a DVR
-automatically rename and organize all your Tv Shows into the right order to be recognized by XBMC
-automatically rename and organize all your Movies to be recognized by XBMC
-Move downloaded files into a separate folder so that you can still keep seeding files, while having another file organized and ready to view
==What you will need (and install)==
-XBMC - http://xbmc.org/download/
-TheRenamer - http://www.therenamer.com/
-EventGhost -http://www.eventghost.org/downloads/
-uTorrent v3.2 Build 27886 -http://www.oldapps.com/utorrent.php?old_utorrent=8183
--NOTE: This is NOT the most up to date version of uTorrent. This version has a feature that was removed later on, was supposed to be reimplemented, and wasnt. For now, use this version
==Websites to know==
-Torrentz -www.torrentz.eu
--A great metaseach website for torrents, which allows you to search many different torrent sites
-EZTV.it
--One of the best sites for downloading and watching TV shows. Used in this guide for its RSS functionality
-uTorrent remote -https://web.utorrent.com/
--This can be used via web based, or android app. This allows you to add torrents remotely into utorrent, so you can have them downloaded before you even get home.
-http://trakt.tv/
--A great website that keeps a list of all the episodes and movies you have on our HTPC. It also keeps track of what you have watched, what you havent, allows you to rate every video after you watch it, and make recommendations
==Some things to note==
-Some elements of this tutorial can obviously be changed up. I am doing this based off my setup, and my system
-I currently have a 1tb internal HDD, and a 4tb external HDD. I personally prefer to keep all my completed media on the external HDD, and the downloading files on the internal one. So all of these tutorials will be based off getting the file from the internet->internal HDD->organized->external
-For the sake of keeping the tutorial simple, when talking about downloading TV shows, I will be refering to the show Breaking Bad. Obviously you can do whatever show you want, but just so I dont have to keep reiterating that, I thought Id say it now
-C drive is my main storage, D drive is my external
====Part 1: Setup====
==Setting up folders==
We need to make the following folders:
C:\Torrents\Complete
C:\Torrents\Incomplete
C:\Torrents\Moving\Movies
C:\Torrents\Moving\TV Shows
D:\Movies -This is our main movie folder
D:\TV Shows New -This is our main tv show folder
-These are the folders where our media files will be downloaded, converted, and moved to.
==Setting up uTorrent==
For this part, Im going to simply copy and paste from Dean Vaughan's blog. He does a good job of describing it, no
sense in paraphrasing. The original post can be found here: http://deanvaughan.org/wordpress/2013/0 ... -for-xbmc/
The goal with uTorrent is to apply labels to the torrents you are downloading so uTorrent will sort the files into directories for you.
The first thing you want to do is set up your labels. In uTorrent go to Options->Preferences->Advanced->UI Extras. Under Persistent Labels type in TV Shows|Movies. The screen shot below is an example.
Next you want to setup uTorrent to place your downloads in an easy to find directory, and to sort those downloads into directories with the same name as your labels. With the uTorrent preferences window still open from the last step, click on Directories. Then check mark ‘Move completed downloads to:’ and also check mark ‘Append the torrent’s label’. In the text box below type in C:\Torrents\Complete. NOTE THIS IS DIFFERENT THAN IN THE SCREEN SHOT. The screen shot below is an example.
Now when you queue up a TV show or movie in uTorrent, you’ll want to apply a label to it. You do this by right clicking the downloading torrent and selecting the label from the menu.
Now you’re all set with uTorrent. Whatever you download and apply a label to will be sorted into directories for you. We also need to setup having an incomplete folder. This is where the files are downloaded to while they are downloading, then they are moved to the completed. Go back to Options->Preferences->Directories, and edit the boxes so they look like this:
==Setting up XBMC==
This part as well, Im going to borrow from Dean, but I will use my file locations. Ill also add in some extra notes, but I just want to make sure I give him some credit
Open XBMC and go to Videos->Files->Add Videos. Click on Browse and find D:\Movies and then click on OK twice.
You’ll get to a screen about setting content, just click on OK again.
Click on Add Videos again, then Browse and find D:\Movies. Click OK twice. This time on the Set Content screen, change ‘This Directory Contains’ to Movies and pock mark ‘Movies are in separate folders that match the movie title’. When done click OK and let it refresh.
Now we’re going to repeat for TV shows. Click on Add Videos again, then Browse and find D:\TV Shows New\. Click OK twice. This time on the Set Content screen, change ‘This Directory Contains’ to TV Shows. When done click OK and let it refresh. Now what we have done is setup XBMC to automatically scan these folders for updates, and add it to our library.
==Setting up TheRenamer==
The renamer is an amazing application that will allow automatically scan a video file, identify the Tvshow, episode number, season, or movie title, rename it, and put it in a folder that matches it, in a seperate directory. An important thing to note is TheRenamer does not copy files, it moves them. There is no original file left. It is removed and moved. That is why I made this tutorial. With TheRenamer, you could potentially just make it automatically pull from your torrents folder, and be done, but that screws up a few things. One big one is it messes up your seeding. Since it removes the file, it wont be there to be seeded. Some trackers will penalize or ban you for having a poor ratio. Also this can cause problems if the file is not fully complete. Another great thing is TheRenamer will remove all those useless info files and sample files,while still moving the subtitle files
TheRenamer has 2 modes, TV and Movies, which work off different databases. The most important thing to know is that the movies portion requires you to select the parent folder of the video file, and it works much smoother when the title of the folder matches the title of the video file. Movies are much trickier than TV shows, as they do not always follow the same rules, where most TV shows have pretty set naming policies.
TheRenamer can work manually and automatically. Manually works by simply dragging the folder/file over, and it will work to rename and organize. The automatic will pull from whats called the fetch folder, which is essentially its default directory. There are different directories and settings for the Tv and Movies mode, but to keep it easy, Ill just copy my settings for both (note there are 3 pages for each, only posted the ones where I changed the settings):
Global Settings:
TV:
Movies:
NOTE: Occasionally, you will have issues with shows not being recognized, seen, w/e. At the very bottom of this tutorial, Ill add how to deal that.
====Part 2: Downloading====
==Manual==
The manual part of this guide is pretty simple. This is more typically done when you need to download a whole season, or if you are on the go and need to download something remotely. Through the use of labels, you can have it automatically renamed and moved. Simply find the torrent you want to download, such as breaking bad season 4, and you should see this window (below). You now need to make sure you edit the label on the download, by changing the box here. For TV shows, do TV, movies, do movies, pretty simple. This will put the file into a seperate sub folder in C:\Torrents\Complete , one for C:\Torrents\Complete\TV\ and one for C:\Torrents\Complete\Movies\.
If you ever forget to do this, and the file is still downloading, you can edit the torrents label by right clicking on the torrent.
If the file is completed, then you need to copy the file/folder to another directory on you computer, then click and drag into TheRenamer, and run it through.
==Automatic==
Through automatic downloading, you can have all your shows instantly begin downloading as soon as they are put online. This is great for people like me who cant watch shows as soon as they air, due to school and work. This is all done through RSS feeds on EZTV.it. I am sure there are other sites out there, but this is the one I prefer, and it what we are sticking to.
The first step is to add the RSS feed. On the side there should be an option that says "Feeds". Right click it and select "Add RSS Feed".
In the top box of that, paste the Feed URL: http://feeds.feedburner.com/eztv-rss-at ... format=xml .
This URL is the same for any TV show you want from EZTV. All the feed is is a list of there most recent uploads. Any changes to this list that match the criteria we are going to setup in a minute, will automatically be added to uTorrent. It should look like the following:
Now that we have our feed setup, we need to setup our specific TV shows we want. Right click the EZTV feed that we just added and select "RSS Downloader". This allows you to create your specific filter for how you want your show to download. Im going to show you a completed filter, and explain some specific parts related to it. Once you have the filter form completed, MAKE SURE to press add in the left corner. Ive forgot more than once and wondered why a show wasnt downloading.
Filter
-This is the Name of the show you want to watch. Always name your shows "*SHOW NAME*" , without the quotes. You need the * to allow there to be text before or after the show name. Make sure however you have it named, is how it appears on EZTV. For example, some shows have both a british and american verison. Based off how you name it in your filter, you can make sure you are getting the show you want
Not
-This would be exclusionary criteria. If the torrent has this word in the title, it will be removed
Quality
-This allows you to set the minimum quality of the video file you want to download. Many times there will be two versions of every episode that are uploaded to EZTV, a standard definition and a HD. Before selecting a higher quality, ensure on the EZTV site that your show has a higher quality option
Label
-This part is important, because we want to make sure that it automatically goes to the C:\Torrents\Complete\TV\ folder
Once completed, make sure to press add, and continue on with adding in all your shows. I suggest closing out after each show is added, just to make sure you saved them all properly.
====Step 3: Event Ghost====
This is the step where everything gets tied together. Currently, when our file begins to download, its in the incomplete folder. When it is completed, it moves to the complete\tv or complete\movies. Now we are going to make an event, so that as soon as a file is added to complete\movies, it copy to a separate directory, to then be processed by TheRenamer, then moved to our final directory. This prevents duplication of files, wasted space, an uninterrupted downloading/seeding.
To make it simple for you, I uploaded my xml file that you can simply open in eventghost. If you have been using the exact same folders as I have, this step is almost done for you. If you havent, then you need tow edit each task with your directories. Here is what your event ghost page should look like (or similar to).
Event ghost xml: http://sdrv.ms/1b9ExvS
NOTE TO x86 users and those who installed TheRenamer or Utorrent in a nondefault directory. I have a x64 system,so my directories might be different than yours. Double check and correct these if need be!
There is an event ghost option to make it so XBMC updates its library automatically, but I personally feel it does it the best within the app itself during a reboot, so I do not use it.
====Step 4: Testing====
This is the last step, just to make sure everything worked. You can either manually download something, or wait until your feed pulls a new show. Either way, once it is downloaded, give it about 5 minutes, because within event ghost there are some timer delays to make sure the files copy properly.
If everything worked, you should see your completed file under D:\Movies or D:\TV Shows New in its properly named folder and season.
====Step 5: Trak.tv (optional)====
http://trakt.tv/downloads/xbmc - plugin for XBMC
http://trakt.tv/downloads - apps for phone
As I described above, this is a great way to keep track of what you have and what you dont have. Also what you have watched and what you havent. Its a good way to keep track with friends and see what they are watching. Its fun and easy to use
====Step 6: uTorrent Remote(optional)====
Ill be adding this later
====Troubleshooting The Renamer===
This part Ill have to add a bit later. Sorry, bit busy recently, and this took 3 hours to write anyway.
====Outro====
I hope this helps you guys out, took me a long time to get this all running smoothly. If you have questions just ask!
Apologise: Utorrent rename files before downloading
| Utorrent rename files before downloading | |
| Utorrent rename files before downloading | |
| Utorrent rename files before downloading |

-
-